Saturday, November 28, 2009

How to draw caricatures and cartoons, Lesson 3:

What not to do:

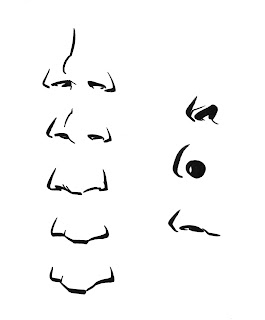
Don't bother drawing every single line on the nose. That'll just make the picture look busy and amateur. Just draw the bottom of it, describing the end of it and the nostrils, and throw a line in there that shows how the bridge connects it to the forehead.

Here's a few different ways to draw teeth. I use the first if I'm in a hurry, the second if the subjects' teeth are important to their likeness. I only use the third and fourth I'm trying to make the subject look bad.
Some folks have a very turned-up nose. This example, on the far upper left, is generally as far as I'll go with that. This is one of those things that if you push it too far, they're going to look bad and you might not get paid.

If someone has a huge nose, you can split the difference between that and the average-sized nose that you've learned how to draw by now. So you draw a nose that's half way between the persons' actual nose, and an average one. This means you can still get a likeness, without offending them. The same goes for the mouth, head size, eye depth, everything. Find that middle ground to make (almost) everyone happy.
Of course, if you want to skewer everyone, take that big nose and make it bigger. Same with the mouth, head size, eye depth, everything.

Tuesday, November 17, 2009

How to draw caricatures and cartoons, Lesson 2a:

Formulas! The nose and mouth.

Simple: There's nothing to the nose... just put it in the right place and watch your line weight. Get that first nose down and move on to the second... learn how to draw accurate foreshortened nostrils.


On the mouth, pay close attention to where the lines are heaviest. This is probably the most important area to control your marker well. Every little change in weight will make a different shape or expression.


Next post: A lot of what not to do

Monday, November 9, 2009

How to draw caricatures and cartoons, Lesson 2:

Formulas.

"But I don't want to learn formulas! I want to learn to draw."

Drawing with a marker requires you to make a lot of very fast decisions. If you're new to this, you can be overwhelmed and disheartened very quickly. This stuff is hard to learn.
Learning formulas to quickly draw features will remove one task from your crowded brain. You'll be more able to focus on placement, line weight, shapes, planes, and carrying on a conversation.
Once learned, these formulas can be adapted to any face, changed, or forgotten. The important thing is that they make your task more endurable now.

1. Draw a thick line on top.


2. Draw a thin line on bottom.


3. The iris is a perfect circle... but don't draw the whole circle.


4. Draw a shadow on the iris, cast by the eyelashes.

5. Put a highlight in the eye. Off-center, not too big.

6. Put the pupil right in the middle of the iris.

7. Add an eyelid.


Do this until you do it without thinking. Most of my new people forget to draw the shadow (step 4) after awhile. Don't forget the shadow. It adds a lot of subtlety and depth.


How the eyelid sits over the iris. Usually, the eye opens just wide enough for the pupil to be exposed, no further.
Don't forget to position the highlight below the shadow.


Wednesday, November 4, 2009

I've finished all the illustrations for Yalu and the Puppy Room, by Brian Yates. Here's pictures three, four, and five. This is the part where she's turned down for adoption, and realizes she's going to have to get proactive if she wants to get anywhere. It's a really cute story, made even cuter by my cute drawings.
Not sure when the publish date is, but Brian and Mystic Publishers are working hard to produce and promote it, so probably not more than a few months. I'm looking forward to having a copy... I don't get to see too much of my own work in print. Yet.